Taking the Homelab to the Cloud: Kubernetes on Azure VMs with Terraform
How I mapped my GitOps homelab experience to Azure cloud primitives — building a three-node Kubernetes cluster on Azure VMs using Terraform modules, private worker networking, and kubeadm bootstrap.
I already run a full GitOps Kubernetes homelab — K3s, Flannel, Flux, SOPS-encrypted secrets, configmap, with all necessary observability tools. The cluster is real, the operational experience is real, and the next logical step was to take that knowledge to the cloud.
Azure is the starting point. AWS comes next. The goal is to push my boundaries on how cloud infrastructure primitives (VNets, NICs, NSGs, public IPs) map to the networking model I already know from running a cluster on bare metal, and to express all of that infrastructure cleanly in Terraform.
This post is a walkthrough of that translation: what the Azure infrastructure looks like, why the network was designed the way it was, where Terraform modules fit in, and what came out of the SSH failures, the NSG reasoning, and the kubeadm bootstrap on Azure VMs.
The end goal is a three-node Kubernetes cluster on Azure VMs:
- 1 control-plane node (publicly reachable for administration)
- 2 worker nodes (private, reachable only through the control plane)
- 1 shared resource group, VNet, subnet, and NSG
- Terraform modules to avoid repeating VM definitions
- Cilium as the CNI plugin
Setup context: Ubuntu 22.04 LTS VMs on Azure, Terraform AzureRM provider
~> 4.0,kubeadmfor Kubernetes bootstrap, Cilium CNI, WSL2 as the operator workstation. Source code:azure/kubernetes-infra.
Who This Is For
This tutorial is for learners who:
- are comfortable with basic Linux and SSH
- have already worked through foundational Terraform and Azure concepts
- want to understand the infrastructure thinking behind a Kubernetes cluster, not just paste files
If you are new to Azure or Terraform, do not start here. Work through the earlier stages in the repository first, then return.
Prerequisite Learning Path
The kubernetes-infra project builds directly on three earlier stages. Each one teaches a layer this project depends on.
Stage 1 — Azure mental model and your first VM stack
azure/stage-1 teaches:
- Azure tenant, subscription, resource group, region, and SKU
- how Terraform talks to Azure via the AzureRM provider
- how a VM stack is composed from resource group, VNet, subnet, NIC, and VM
- how to authenticate locally with Azure CLI
Do this first if you still need to build a mental model for why a VM needs a NIC, what a subnet is for, or how Terraform resource references work.
Stage 2 — Terraform variables
azure/stage-2 teaches:
- how to declare
variableblocks - how to use
terraform.tfvarsto keep environment values separate from logic - why hard-coded values become a problem quickly
The Kubernetes project is fully parameterised and depends on this habit.
Stage 3 — Locals, outputs, and modules
azure/stage-3 teaches:
- how
localsreduce repetition - how
outputsexpose useful infrastructure values after apply - how Terraform modules work and how a root module differs from a child module
This is the direct bridge into kubernetes-infra, where you stop thinking in one VM and start thinking in a reusable, repeatable cluster design.
Step 1: The Right Terraform Mental Model
Before writing any resource, the design question is:
What is shared across the whole cluster, and what belongs to each individual node?
In this project, shared resources are:
- resource group
- VNet
- subnet
- NSG
Per-node resources are:
- NIC
- VM
- public IP (control plane only)
That boundary is the entire design. Everything in the Terraform code follows from it: shared resources live in the root module, per-node resources are created through a reusable module called once per node.
Step 2: Build the Shared Network First
The root main.tf starts with the shared network foundation:
resource "azurerm_resource_group" "rg" {
  name     = local.rg_name
  location = var.location
}

resource "azurerm_virtual_network" "vnet" {
  name                = var.vnet_name
  location            = azurerm_resource_group.rg.location
  resource_group_name = azurerm_resource_group.rg.name
  address_space       = var.vnet_address_space_cidr
}

resource "azurerm_subnet" "subnet" {
  name                 = var.subnet_name
  resource_group_name  = azurerm_resource_group.rg.name
  virtual_network_name = azurerm_virtual_network.vnet.name
  address_prefixes     = var.subnet_address_space_cidr
}

resource "azurerm_network_security_group" "nsg" {
  name                = var.nsg_name
  location            = azurerm_resource_group.rg.location
  resource_group_name = azurerm_resource_group.rg.name
}

resource "azurerm_subnet_network_security_group_association" "subnet_nsg_assoc" {
  subnet_id                 = azurerm_subnet.subnet.id
  network_security_group_id = azurerm_network_security_group.nsg.id
}
The reason the VNet and subnet are cluster resources rather than per-node details is that Kubernetes nodes are not isolated machines — they are part of a distributed system that must communicate reliably:
- workers must reach the API server
- the control plane must reach kubelets
- pod networking must work across nodes
All of that traffic crosses the subnet. So the subnet is cluster infrastructure, provisioned once, shared by all three nodes.
The locals block builds the resource group name from variables, and derives the cluster_subnet_cidr for use in NSG rules later:
locals {
  rg_name             = "${var.project_name}-${var.environment}-rg"
  cluster_subnet_cidr = var.subnet_address_space_cidr[0]
  ...
}
And the values come from terraform.tfvars:
project_name  = "kubernetes-cluster"
environment   = "dev"
location      = "East US"
vnet_name     = "kubernetes-cluster-vnet"
subnet_name   = "kubernetes-cluster-subnet"
nsg_name      = "kubernetes-cluster-network-firewall"
ssh_source_ip = "YOUR_ADMIN_IP/32"
Step 3: Create One NIC Per Node
Next, the project creates three NICs — one per node — directly in the root module:
resource "azurerm_public_ip" "control_plane_pip" {
  name                = "${var.project_name}-control-plane-pip"
  location            = azurerm_resource_group.rg.location
  resource_group_name = azurerm_resource_group.rg.name
  allocation_method   = "Static"
  sku                 = "Standard"
}

resource "azurerm_network_interface" "nic-control-plane" {
  name                = "${var.project_name}-control-plane-nic"
  location            = azurerm_resource_group.rg.location
  resource_group_name = azurerm_resource_group.rg.name

  ip_configuration {
    name                          = "internal"
    subnet_id                     = azurerm_subnet.subnet.id
    private_ip_address_allocation = "Dynamic"
    public_ip_address_id          = azurerm_public_ip.control_plane_pip.id
  }
}

resource "azurerm_network_interface" "nic-worker-plane-1" {
  name                = "${var.project_name}-worker-plane-nic-1"
  location            = azurerm_resource_group.rg.location
  resource_group_name = azurerm_resource_group.rg.name

  ip_configuration {
    name                          = "internal"
    subnet_id                     = azurerm_subnet.subnet.id
    private_ip_address_allocation = "Dynamic"
  }
}

resource "azurerm_network_interface" "nic-worker-plane-2" {
  name                = "${var.project_name}-worker-plane-nic-2"
  ...
  # same as nic-worker-plane-1, no public_ip_address_id
}
The pattern is deliberate:
- the control-plane NIC gets a public IP attached — this is the admin entry point
- the worker NICs do not — they exist only on the private subnet
This creates two classes of nodes from a networking perspective, which is exactly right for a cluster.
Step 4: Understand What a Public IP Actually Does
The control plane has a public IP. That does not mean all ports are open.
A public IP only creates a possible route:
Internet → Public IP → Control-plane NIC → VMThat path still depends on:
- NSG rules allowing the specific traffic
- the VM guest OS firewall not blocking it
- the target service actually listening on the port
This is one of the most important beginner lessons in the project. I got confused by it early on — I saw a public IP and assumed the VM was exposed. It isn’t, until you explicitly allow the traffic through. The NSG is the real gatekeeper.
Step 5: Allow Only the Traffic the Cluster Needs
The NSG rules are built from a locals map in main.tf and applied using for_each:
locals {
  required_internal_rules = {
    allow_k8s_api = {
      priority                   = 110
      protocol                   = "Tcp"
      destination_port_ranges    = ["6443"]
      source_address_prefixes    = var.subnet_address_space_cidr
      destination_address_prefix = local.cluster_subnet_cidr
    }
    allow_kubelet = {
      priority                   = 120
      protocol                   = "Tcp"
      destination_port_ranges    = ["10250"]
      source_address_prefixes    = var.subnet_address_space_cidr
      destination_address_prefix = local.cluster_subnet_cidr
    }
    allow_etcd = {
      priority                   = 130
      protocol                   = "Tcp"
      destination_port_ranges    = ["2379-2380"]
      source_address_prefixes    = var.subnet_address_space_cidr
      destination_address_prefix = local.cluster_subnet_cidr
    }
    allow_control_plane_components = {
      priority                   = 140
      protocol                   = "Tcp"
      destination_port_ranges    = ["10257", "10259"]
      source_address_prefixes    = var.subnet_address_space_cidr
      destination_address_prefix = local.cluster_subnet_cidr
    }
    allow_kube_proxy = {
      priority                   = 150
      protocol                   = "Tcp"
      destination_port_ranges    = ["10256"]
      source_address_prefixes    = var.subnet_address_space_cidr
      destination_address_prefix = local.cluster_subnet_cidr
    }
    allow_cilium_health = {
      priority                   = 160
      protocol                   = "Tcp"
      destination_port_ranges    = ["4240"]
      source_address_prefixes    = var.subnet_address_space_cidr
      destination_address_prefix = local.cluster_subnet_cidr
    }
    allow_ssh = {
      priority                   = 170
      protocol                   = "Tcp"
      destination_port_ranges    = ["22"]
      source_address_prefixes    = [var.ssh_source_ip]
      destination_address_prefix = local.cluster_subnet_cidr
    }
  }

  optional_rules = merge(
    var.enable_cilium_vxlan ? {
      allow_cilium_vxlan = {
        priority                   = 180
        protocol                   = "Udp"
        destination_port_ranges    = ["8472"]
        source_address_prefixes    = var.subnet_address_space_cidr
        destination_address_prefix = local.cluster_subnet_cidr
      }
    } : {}
  )

  nsg_rules = merge(local.required_internal_rules, local.optional_rules)
}

resource "azurerm_network_security_rule" "inbound" {
  for_each = local.nsg_rules

  name                        = each.key
  priority                    = each.value.priority
  direction                   = "Inbound"
  access                      = "Allow"
  protocol                    = each.value.protocol
  source_port_range           = "*"
  destination_port_ranges     = each.value.destination_port_ranges
  source_address_prefixes     = each.value.source_address_prefixes
  destination_address_prefix  = each.value.destination_address_prefix
  resource_group_name         = azurerm_resource_group.rg.name
  network_security_group_name = azurerm_network_security_group.nsg.name
}
A few things worth noting about this rule set:
6443— Kubernetes API server. Workers andkubectlreach the control plane here.10250— kubelet API. The control plane communicates with worker kubelets on this port.2379-2380— etcd. Cluster state replication between control-plane components.10257,10259— controller manager and scheduler health/metrics endpoints.10256— kube-proxy health check port. Not general traffic, but required for cluster health probes.4240— Cilium agent health check. Required for Cilium to confirm pod-to-pod reachability.8472/UDP— Cilium VXLAN overlay. This is only needed if you run Cilium in VXLAN tunnel mode. If you use native routing or eBPF direct routing, you can setenable_cilium_vxlan = falseand skip this rule.22— SSH. Restricted tovar.ssh_source_ip, your admin machine IP. This is the only rule that comes from outside the subnet.
The merge() pattern for optional rules is worth stealing for any project where some NSG rules are conditional. It keeps the required baseline clean and the optional additions explicit.
Rather than memorising ports, the better question to ask for each rule is: who needs to talk to whom, over which path, and should that traffic stay private?
Step 6: The kubernetes-node Module
Instead of writing three near-identical azurerm_linux_virtual_machine blocks, the project uses a kubernetes-node module. Here is the full module (modules/kubernetes-node/main.tf):
resource "azurerm_linux_virtual_machine" "vm" {
  name                = var.node_name
  location            = var.location
  resource_group_name = var.rg_name
  zone                = var.vm_zone
  size                = var.vm_size
  admin_username      = var.admin_username

  network_interface_ids = var.network_interface_ids

  disable_password_authentication = true

  admin_ssh_key {
    username   = var.admin_username
    public_key = file(var.public_key_path)
  }

  os_disk {
    caching              = "ReadWrite"
    storage_account_type = var.os_disk_storage_account_type
  }

  source_image_reference {
    publisher = var.image_publisher
    offer     = var.image_offer
    sku       = var.image_sku
    version   = var.image_version
  }
}
The module accepts the NIC ID as network_interface_ids. That is the key input that makes each node unique. Everything else — OS image, SSH key, disk type — is the same across nodes. The module captures that sameness; the NIC ID captures the difference.
disable_password_authentication = true is intentional. All access is via SSH key only.
Step 7: Wire the Nodes in the Root Module
Back in the root module, the three VMs are created by calling the module three times:
module "control-plane" {
  source = "./modules/kubernetes-node"

  node_name                    = "${var.project_name}-control-plane"
  rg_name                      = azurerm_resource_group.rg.name
  location                     = azurerm_resource_group.rg.location
  vm_zone                      = "3"
  vm_size                      = "Standard_DC2s_v3"
  admin_username               = "azureuser"
  public_key_path              = "~/.ssh/azure/kubernetes.pub"
  os_disk_storage_account_type = "Standard_LRS"
  image_publisher              = "Canonical"
  image_offer                  = "0001-com-ubuntu-server-jammy"
  image_sku                    = "22_04-lts-gen2"
  image_version                = "latest"
  network_interface_ids        = [azurerm_network_interface.nic-control-plane.id]
}

module "worker-node-1" {
  source = "./modules/kubernetes-node"

  node_name                    = "${var.project_name}-worker-node-1"
  rg_name                      = azurerm_resource_group.rg.name
  location                     = azurerm_resource_group.rg.location
  vm_zone                      = "3"
  vm_size                      = "Standard_DC1s_v3"
  admin_username               = "azureuser"
  public_key_path              = "~/.ssh/azure/kubernetes.pub"
  os_disk_storage_account_type = "Standard_LRS"
  image_publisher              = "Canonical"
  image_offer                  = "0001-com-ubuntu-server-jammy"
  image_sku                    = "22_04-lts-gen2"
  image_version                = "latest"
  network_interface_ids        = [azurerm_network_interface.nic-worker-plane-1.id]
}

module "worker-node-2" {
  source = "./modules/kubernetes-node"

  node_name     = "${var.project_name}-worker-node-2"
  ...
  network_interface_ids = [azurerm_network_interface.nic-worker-plane-2.id]
}
The control plane uses Standard_DC2s_v3 (2 vCPUs) — the minimum viable size for a Kubernetes control plane. The workers use Standard_DC1s_v3 (1 vCPU). You could use the same size for both; the point is the control plane needs a bit more headroom for etcd, the API server, and the scheduler running simultaneously.
Step 8: Outputs Are Operational Tools
As soon as the infrastructure was running, I immediately needed the IP addresses to actually use it. Outputs become necessary, not just nice-to-have. outputs.tf:
output "control_plane_public_ip" {
  description = "Public IP address assigned to the Kubernetes control-plane node."
  value       = azurerm_public_ip.control_plane_pip.ip_address
}

output "control_plane_ssh_target" {
  description = "SSH target for the Kubernetes control-plane node."
  value       = "azureuser@${azurerm_public_ip.control_plane_pip.ip_address}"
}

output "worker_private_ips" {
  description = "Private IP addresses for the Kubernetes worker nodes."
  value = {
    worker_node_1 = azurerm_network_interface.nic-worker-plane-1.private_ip_address
    worker_node_2 = azurerm_network_interface.nic-worker-plane-2.private_ip_address
  }
}
After terraform apply, read them immediately:
terraform output control_plane_public_ip
terraform output control_plane_ssh_target
terraform output worker_private_ips
Expected output:
control_plane_public_ip = "x.x.x.x"
control_plane_ssh_target = "azureuser@x.x.x.x"
worker_private_ips = {
  "worker_node_1" = "172.16.1.x"
  "worker_node_2" = "172.16.1.y"
}
These values drive everything in the bootstrap and worker access steps that follow.
Step 9: SSH Access — Jump Host and Agent Forwarding
Because the workers have no public IPs, the admin path is:
Laptop → control-plane public IP → control-plane VM → worker private IPThis is the standard jump-host pattern. The complication I hit was an SSH failure on the second hop.
- laptop to control plane: worked
- control plane could ping worker private IP: worked
- SSH from control plane to worker:
Permission denied (publickey)
That was not a network problem. The network path was fine. The problem was the private key was not available on the control plane for the second authentication.
The fix is SSH agent forwarding:
# On your laptop — start the agent and load the key
eval "$(ssh-agent -s)"
ssh-add ~/.ssh/azure/kubernetes
ssh-add -L  # verify the key is loaded
# SSH to the control plane with -A (agent forwarding enabled)
ssh -A -i ~/.ssh/azure/kubernetes azureuser@<control-plane-public-ip># From inside the control plane — SSH to a worker
ssh-add -L # confirm the forwarded key is visible here
ssh azureuser@<worker-private-ip>If ssh-add -L on the control plane prints your public key, agent forwarding is active and the second hop will authenticate correctly.
Alternatively, skip the interactive control-plane shell entirely using ProxyJump directly from your laptop:
ssh -A -J azureuser@<control-plane-public-ip> -i ~/.ssh/azure/kubernetes azureuser@<worker-private-ip>And to copy a script to a worker from your laptop:
scp -o ProxyJump=azureuser@<control-plane-public-ip> install-worker.sh azureuser@<worker-private-ip>:~The lesson: network reachability and SSH authentication are separate concerns. The worker was reachable. The key was just not available at the right hop.
Step 10: Bootstrap Kubernetes on the Control Plane
Before running kubeadm init, the VM needs several prerequisites. These are the steps that most tutorials skip and where beginners get stuck.
Pre-flight setup (run on each node)
# Disable swap — Kubernetes requires this
sudo swapoff -a
sudo sed -i '/ swap / s/^\(.*\)$/#\1/g' /etc/fstab

# Load required kernel modules
cat <<EOF | sudo tee /etc/modules-load.d/k8s.conf
overlay
br_netfilter
EOF
sudo modprobe overlay
sudo modprobe br_netfilter

# Enable IP forwarding and bridge netfilter
cat <<EOF | sudo tee /etc/sysctl.d/k8s.conf
net.bridge.bridge-nf-call-iptables  = 1
net.bridge.bridge-nf-call-ip6tables = 1
net.ipv4.ip_forward                 = 1
EOF
sudo sysctl --system

# Install containerd
sudo apt-get update
sudo apt-get install -y containerd
sudo mkdir -p /etc/containerd
containerd config default | sudo tee /etc/containerd/config.toml
# Set SystemdCgroup = true in the containerd config
sudo sed -i 's/SystemdCgroup = false/SystemdCgroup = true/' /etc/containerd/config.toml
sudo systemctl restart containerd
sudo systemctl enable containerd

# Install kubeadm, kubelet, kubectl
sudo apt-get install -y apt-transport-https ca-certificates curl
curl -fsSL https://pkgs.k8s.io/core:/stable:/v1.29/deb/Release.key | sudo gpg --dearmor -o /etc/apt/keyrings/kubernetes-apt-keyring.gpg
echo 'deb [signed-by=/etc/apt/keyrings/kubernetes-apt-keyring.gpg] https://pkgs.k8s.io/core:/stable:/v1.29/deb/ /' | sudo tee /etc/apt/sources.list.d/kubernetes.list
sudo apt-get update
sudo apt-get install -y kubelet kubeadm kubectl
sudo apt-mark hold kubelet kubeadm kubectl
Initialise the control plane
On the control-plane node only:
sudo kubeadm init \
  --pod-network-cidr=10.244.0.0/16 \
  --control-plane-endpoint=<control-plane-private-ip>
Set up kubectl access:
mkdir -p $HOME/.kube
sudo cp /etc/kubernetes/admin.conf $HOME/.kube/config
sudo chown $(id -u):$(id -g) $HOME/.kube/config
Install Cilium as the CNI
# Install the Cilium CLI
CILIUM_CLI_VERSION=$(curl -s https://raw.githubusercontent.com/cilium/cilium-cli/main/stable.txt)
curl -L --remote-name-all "https://github.com/cilium/cilium-cli/releases/download/${CILIUM_CLI_VERSION}/cilium-linux-amd64.tar.gz"
sudo tar -C /usr/local/bin -xzf cilium-linux-amd64.tar.gz

# Install Cilium into the cluster
cilium install
cilium status --wait
Verify the control plane is healthy
kubectl get nodes -o wide
kubectl get pods -A
Step 11: What’s Next — Join the Workers
The workers are reachable from the control plane by private IP. That means the worker join workflow is:
- SSH to control plane (with agent forwarding).
- From the control plane or via
ProxyJump, SSH to the worker private IP. - Run the pre-flight setup on each worker (same as Step 10, minus
kubeadm init). - Copy and run the
kubeadm joincommand from the control plane on each worker.
Get the join command from the control plane:
kubeadm token create --print-join-commandRun it on each worker node:
sudo kubeadm join <control-plane-private-ip>:6443 \
  --token <token> \
  --discovery-token-ca-cert-hash sha256:<hash>
Then back on the control plane:
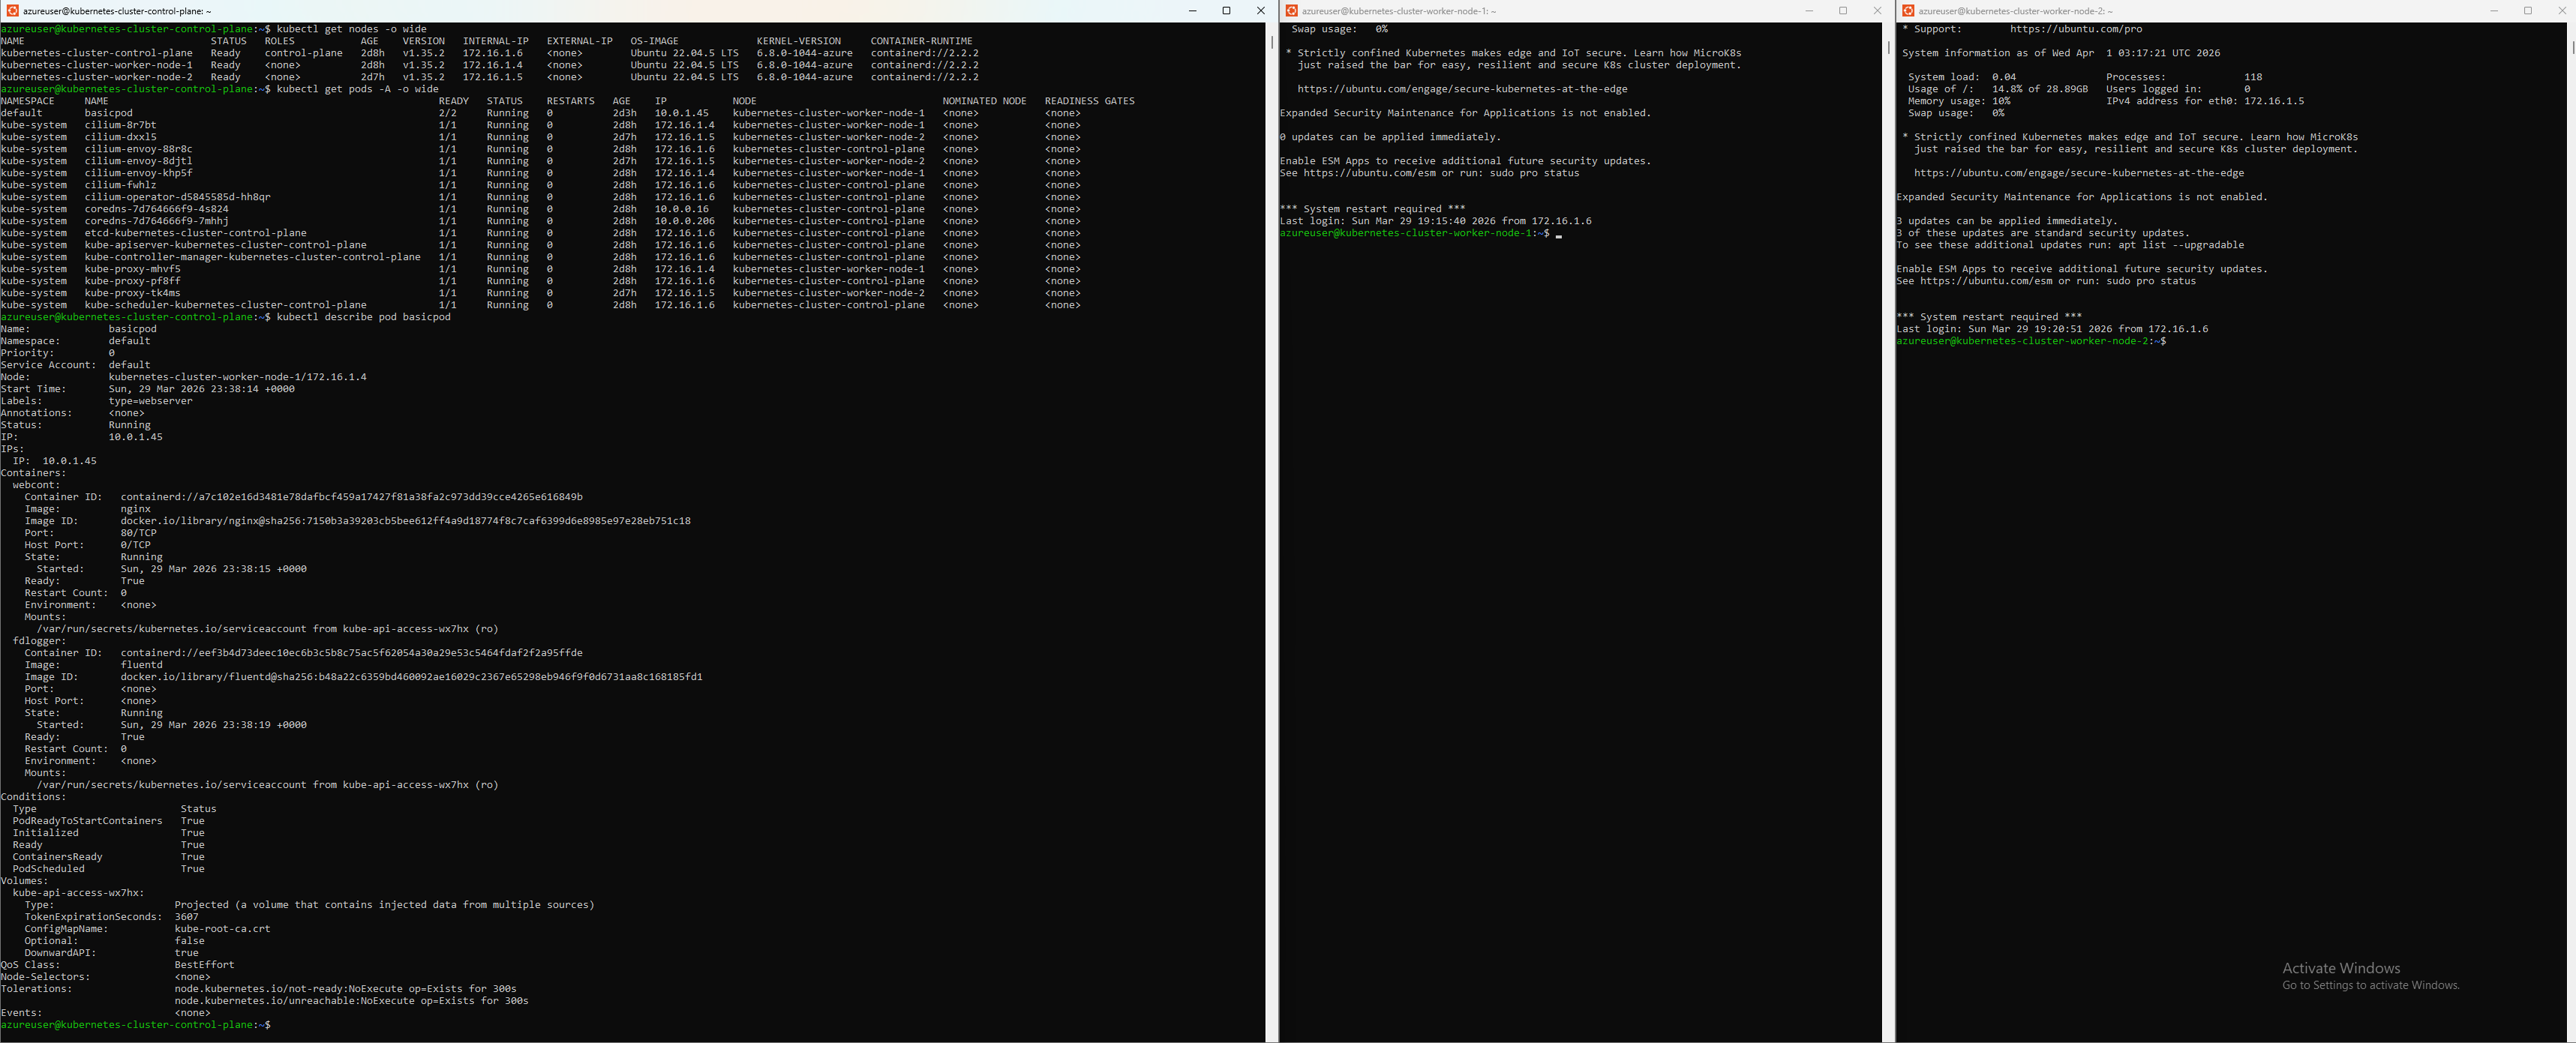
Expected output once everything is running:
azureuser@kubernetes-cluster-control-plane:~$ kubectl get nodes -o wide
NAME                               STATUS   ROLES           AGE    VERSION   INTERNAL-IP   EXTERNAL-IP   OS-IMAGE             KERNEL-VERSION     CONTAINER-RUNTIME
kubernetes-cluster-control-plane   Ready    control-plane   2d8h   v1.35.2   172.16.1.6    <none>        Ubuntu 22.04.5 LTS   6.8.0-1044-azure   containerd://2.2.2
kubernetes-cluster-worker-node-1   Ready    <none>          2d8h   v1.35.2   172.16.1.4    <none>        Ubuntu 22.04.5 LTS   6.8.0-1044-azure   containerd://2.2.2
kubernetes-cluster-worker-node-2   Ready    <none>          2d8h   v1.35.2   172.16.1.5    <none>        Ubuntu 22.04.5 LTS   6.8.0-1044-azure   containerd://2.2.2

azureuser@kubernetes-cluster-control-plane:~$ kubectl get pods -A -o wide
NAMESPACE     NAME                                                       READY   STATUS    RESTARTS   AGE    IP           NODE                               NOMINATED NODE   READINESS GATES
kube-system   cilium-8r7bt                                               1/1     Running   0          2d8h   172.16.1.4   kubernetes-cluster-worker-node-1   <none>           <none>
kube-system   cilium-dxxl5                                               1/1     Running   0          2d8h   172.16.1.5   kubernetes-cluster-worker-node-2   <none>           <none>
kube-system   cilium-envoy-88r8c                                         1/1     Running   0          2d8h   172.16.1.6   kubernetes-cluster-control-plane   <none>           <none>
kube-system   cilium-envoy-8djtl                                         1/1     Running   0          2d8h   172.16.1.5   kubernetes-cluster-worker-node-2   <none>           <none>
kube-system   cilium-envoy-khp5f                                         1/1     Running   0          2d8h   172.16.1.4   kubernetes-cluster-worker-node-1   <none>           <none>
kube-system   cilium-fwhlz                                               1/1     Running   0          2d8h   172.16.1.6   kubernetes-cluster-control-plane   <none>           <none>
kube-system   cilium-operator-d5845585d-hh8qr                            1/1     Running   0          2d8h   172.16.1.6   kubernetes-cluster-control-plane   <none>           <none>
kube-system   coredns-7d764666f9-4s824                                   1/1     Running   0          2d8h   10.0.0.16    kubernetes-cluster-control-plane   <none>           <none>
kube-system   coredns-7d764666f9-7mhhj                                   1/1     Running   0          2d8h   10.0.0.206   kubernetes-cluster-control-plane   <none>           <none>
kube-system   etcd-kubernetes-cluster-control-plane                      1/1     Running   0          2d8h   172.16.1.6   kubernetes-cluster-control-plane   <none>           <none>
kube-system   kube-apiserver-kubernetes-cluster-control-plane            1/1     Running   0          2d8h   172.16.1.6   kubernetes-cluster-control-plane   <none>           <none>
kube-system   kube-controller-manager-kubernetes-cluster-control-plane   1/1     Running   0          2d8h   172.16.1.6   kubernetes-cluster-control-plane   <none>           <none>
kube-system   kube-proxy-mhvf5                                           1/1     Running   0          2d8h   172.16.1.4   kubernetes-cluster-worker-node-1   <none>           <none>
kube-system   kube-proxy-pf8ff                                           1/1     Running   0          2d8h   172.16.1.6   kubernetes-cluster-control-plane   <none>           <none>
kube-system   kube-proxy-tk4ms                                           1/1     Running   0          2d8h   172.16.1.5   kubernetes-cluster-worker-node-2   <none>           <none>
kube-system   kube-scheduler-kubernetes-cluster-control-plane            1/1     Running   0          2d8h   172.16.1.6   kubernetes-cluster-control-plane   <none>           <none>
That output confirmed the control-plane VM was healthy, the network design was viable, and kubeadm bootstrap worked end to end, and both workers appear as Ready once Cilium has assigned them a network identity.
The Biggest Lessons
A public IP is not the same thing as open access
A public IP creates a possible route. Traffic still needs:
- an NSG rule allowing it
- the guest OS not blocking it
- a service listening on the port
An NSG allow rule does not make a node internet-reachable
A worker can be covered by an SSH allow rule and still be unreachable from the internet, because there is no public path to it. No public IP, no load balancer NAT, no firewall DNAT. Policy and reachability are different questions — both must be true.
Keep the workers private
The control plane is the admin entry point. Workers stay on private networking unless there is a deliberate reason not to. This project reinforced that model in a practical way.
Outputs are operational, not decorative
Outputs are not just for demos or CI pipelines. They become immediately necessary once you need to actually operate what Terraform built.
Terraform structure should mirror the architecture
Shared network resources in the root, per-node resources in a module called once per node. When the code structure matches the design, the infrastructure is easier to reason about, change, and extend.
Troubleshooting
Permission denied (publickey) on the second SSH hop
The network path is fine. The private key is not available on the control plane for the second hop. Fix: start ssh-agent on your laptop, load the key with ssh-add, and connect to the control plane with ssh -A. See Step 9.
kubeadm init fails with “swap is enabled”
Swap must be disabled. Run sudo swapoff -a and make it permanent by commenting out the swap line in /etc/fstab.
kubeadm init fails with a container runtime error
Containerd must be running and configured with SystemdCgroup = true. Check with:
sudo systemctl status containerd
sudo cat /etc/containerd/config.toml | grep SystemdCgroup
Nodes stuck in NotReady after joining
The CNI plugin (Cilium) is not yet running on the new node. Give it 30–60 seconds after the join completes, then recheck:
kubectl get pods -n kube-system -l k8s-app=cilium
kubectl get nodes
SSH to control plane times out after terraform apply
Wait 60–90 seconds for the VM to fully boot and for sshd to start. Azure VMs take a moment after provisioning. Also confirm your ssh_source_ip in terraform.tfvars matches your current public IP.
Closing Thought
What this project taught me is that the infrastructure work in a Kubernetes cluster is mostly about defining the right boundaries — shared versus per-node, private versus public, policy versus reachability.
Terraform does not make those boundaries for you. It makes them explicit and reproducible once you have thought them through. The moment the root module held shared network resources and the module held per-node VMs, the whole design read correctly.
If you are working through the same learning path, use the earlier stages as the foundation they are. The kubernetes-infra project is where the earlier concepts become a real, running system.
References
Terraform
Azure
- Install Azure CLI
- Azure resource groups
- Azure Virtual Network overview
- Azure network interfaces
- How NSGs filter traffic
- Manage NSGs
- Azure availability zones
Kubernetes
- Install kubeadm
- Create a cluster with kubeadm
- Container runtimes
- Kubernetes ports and protocols
- Install kubectl on Linux
Comments